Analysis and Prevention of Hot Bending Cracks in SA-106B Seamless Steel Pipes
Abstract: Cracking occurred in SA-106B seamless steel pipes during induction heating hot bending. To determine the cause, tests were conducted on the pipes’ physical and chemical properties, as well as the hardness uniformity across the entire cross-section. Cracked samples were examined using optical microscopy and energy-dispersive spectroscopy (EDS). The results indicated that the pipes had come into contact with copper fittings during production, resulting in copper adhesion on their surfaces. During induction heating, a molten Cu-rich phase formed and diffused along the grain boundaries, degrading the microstructure and causing “copper-induced brittleness” cracking under tensile stress. A comprehensive investigation revealed that the issue originated from the brass guide sleeve at the outlet of the straightening machine. Replacing the brass guide sleeve with a nylon one effectively eliminated copper-induced cracking. The study indicates that for steel pipes requiring hot bending, contact with copper or other low-melting-point metal fittings should be strictly avoided during production to prevent cracking caused by metal adhesion and grain boundary penetration. Additionally, contact with such materials should be avoided during transportation, handling, and storage to prevent potential contamination or structural damage. Seamless steel pipes, as essential materials in modern industry, are widely used in construction, transportation, machinery manufacturing, energy production, and chemical processing. SA-106B seamless steel pipes, known for their high strength, good toughness, and corrosion resistance, are widely used in the boiler, petroleum, and chemical industries. They are particularly suitable for manufacturing critical components such as water walls, superheaters, reheaters, heat exchangers, and high-pressure pipelines. With typical operating pressures ranging from 6 to 14 MPa, SA-106B steel pipes are classified as high-pressure vessel materials and play a vital role in ensuring the safety and operational reliability of equipment. In the manufacturing of boiler pipe fittings, pipe bending is a critical process that directly influences product quality and structural reliability. Depending on the pipe’s size and material, bending methods are generally classified as cold forming or hot bending. Cold forming is typically employed for small-diameter pipes and requires subsequent tempering heat treatment to relieve internal stresses. In contrast, hot bending involves simultaneous heating and forming, followed by tempering. The induction heating temperature typically reaches approximately 950 °C, after which the pipe is air-cooled, making this method particularly suitable for large-diameter applications. The SA-106B seamless steel pipe is a pearlitic steel, characterized by relatively high carbon and manganese contents. While these alloying elements enhance the material’s strength and wear resistance, they also increase its sensitivity to overheating, which reduces plasticity and toughness, making the steel prone to cracking during cold forming. Hot bending, however, employs induction heating to locally raise the temperature to approximately 950 °C, thereby enhancing the material’s plasticity before deformation. Subsequent tempering heat treatment effectively relieves residual stresses and enhances the overall mechanical properties of the material. This process not only ensures product quality but also improves production efficiency and reduces manufacturing costs. Consequently, SA-106B seamless steel pipe is more suitable for hot bend forming. However, during the production of boiler pipe fittings made from SA-106B seamless steel pipe (φ219.1 mm × 20 mm), cracking was observed in certain areas during the hot bending process. Localized cracks developed when the pipe was heated to 900–950 °C and subjected to bending. To identify the cause and develop effective countermeasures, a systematic experimental investigation was conducted. The microstructure and forming process were analyzed using various testing methods. Based on the results, key production parameters were optimized and adjusted, effectively eliminating cracking and ensuring the successful application of the hot bending process for SA-106B steel.
In this study, the test material was an SA-106B seamless steel pipe produced by a domestic steel mill, with an outer diameter of 219.1 mm and a wall thickness of 20 mm. The production process comprised 120 t converter smelting, LF refining, RH vacuum degassing, and continuous casting, after which 230 mm round billets were heated, pierced, and hot-rolled into pipes with a controlled diameter reduction. Subsequent processes included normalizing, straightening, flaw detection, inspection, packaging, labeling, and storage. The test pipes were formed by induction bending at 900–950 °C, after which surface cracks were observed in certain areas. To determine the cause of cracking, cross-sectional specimens were extracted along the wall thickness at the crack locations. The chemical composition of the cracked steel was determined using an ARL 4460 direct-reading optical emission spectrometer, with the results summarized in Table 1. The results of the analysis verified that the chemical composition satisfied the ASME SA-106 standard as well as the pertinent technical specifications. The physical and chemical properties of the material, as well as the hardness uniformity across the pipe wall, were assessed. Unbent pipes from the same batch were subjected to Brinell hardness testing, measurements of tensile and yield strength, flattening tests, and analyses of microstructure, grain size, and non-metallic inclusions. Specimens were extracted from the crack zones of the bent pipes to examine crack morphology and assess hardness uniformity with a Brinell hardness tester. The depth of the cracks was determined using an Axiovert 200MAT optical microscope. To reveal the microstructure near the cracks, the samples were etched with 4% nital for 4–5 s. Elemental composition in the crack regions was subsequently analyzed using energy-dispersive spectroscopy (EDS) on an INCA spectrometer.
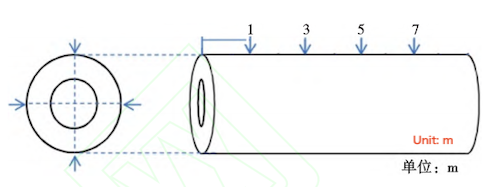
Brinell hardness, tensile strength, and yield strength tests were performed on the same batch of SA-106B seamless steel pipes supplied by the customer before bending. In addition, flattening tests were conducted to evaluate the microstructure, grain size, and non-metallic inclusions. Samples were taken along the pipe axis at 1 m, 3 m, and 5.7 m from the pipe end. Hardness measurements were taken circumferentially along the outer surface, covering 360°, as shown in Figure 1.

Figure 1. Schematic diagram of sampling positions on SA-106B steel pipe
The results showed uniform Brinell hardness around the full 360° circumference. Both tensile and yield strengths met the requirements of the relevant standards, with measured values falling within the acceptable range. No cracks, delamination, or other defects were observed after cold pressing the pipes closed, consistent with the factory inspection results. These findings confirm that the material exhibited good cold plasticity. No cracks, delamination, or other defects were observed after cold pressing the pipes closed, consistent with the factory inspection results. These findings confirm that the material possesses good cold plasticity.
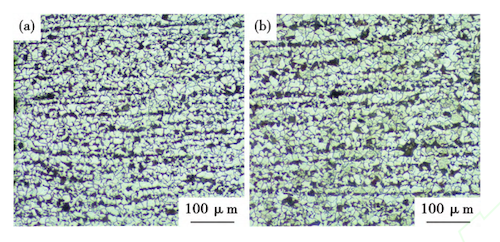
According to GB/T 13298–2015, the microstructure of the tested samples consisted of ferrite and pearlite (F+P), with a uniform distribution along the entire pipe length, as shown in Figure 3. Grain size, determined in accordance with GB/T 6394–2017, ranged from Grade 8.0 to Grade 7.0. Non-metallic inclusions were assessed following GB/T 10561–2023, with the results as follows:
A-fine: 0.5 B-fine: 0.5 D-fine: 0.5 D-coarse: 0.5
A-coarse, B-coarse, C-fine, C-coarse, DS: 0
The findings show that the non-metallic inclusion content remained within acceptable limits, demonstrating that the material quality is satisfactory and compliant with the applicable technical standards.
The entire batch of SA-106B seamless steel pipes underwent full-length ultrasonic testing prior to shipment, and all pipes passed inspection. Testing was conducted in accordance with ASTM E213–14, using a comparative acceptance level of 5% of the wall thickness. The reference calibration sample dimensions were 25 mm × 0.5 mm × 1.0 mm (length × width × depth). The ultrasonic inspection encompassed longitudinal, transverse, and diagonal scans, as well as delamination detection and thickness measurements. To further confirm product integrity, the customer repeated on-site ultrasonic testing before hot bending. The testing confirmed that the pipes were free of internal defects or discontinuities. Table 1 lists the chemical composition (mass fraction) of the steel, and Figures 2 and 3 illustrate the mechanical properties and metallographic features.
Table 1. Chemical composition (mass fraction, %) of SA-106B test steel
Item | C | Mn | Si | S | Cr | Ni | Cu | Mo |
Standard | ≤0.25 | 0.29–1.35 | ≥0.10 | ≤0.025 | ≤0.40 | ≤0.40 | ≤0.40 | ≤0.15 |
Test Steel | 0.19 | 1.09 | 0.27 | 0.010 | 0.002 | 0.12 | 0.03 | 0.03 |

Figure 2. Mechanical properties of unbent SA-106B steel pipe
(a) Surface hardness (b) Tensile and yield strength (c) Elongation

Figure 3. Metallographic structure of SA-106B steel pipe
(a) 1 m section (b) 5 m section
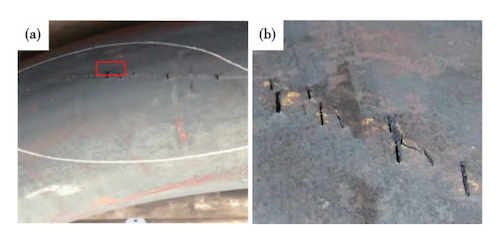
The total length of the SA-106B steel test pipe was approximately 8 m, with the hot-bent section located about 2.7 m from the pipe end. Cracks were observed on the outer arc of the hot-bent section. Macroscopic examination revealed that the outer arc surface exhibited multiple fine transverse cracks arranged in an overall spiral pattern, as shown in Figure 4(a). Additionally, scratches were observed near the cracked region, and yellowish deposits adhered to the surface, as illustrated in Figure 4(b).

Figure 4. Macromorphology of cracks on the outer arc of the SA-106B steel pipe
(a) Overall spiral distribution of surface cracks (b) Local surface scratches and yellow deposits
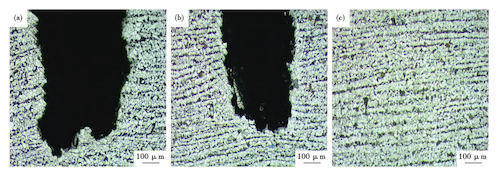
The cracked SA-106B steel pipe from the bending process was cut longitudinally, and two representative cracks were selected for micromorphological observation. The specimens were labeled Specimen 1 and Specimen 2, and examined using a high-magnification optical microscope. The measured crack depths of Specimen 1 and Specimen 2 were 3.77 mm and 1.94 mm, respectively. Fine secondary microcracks were observed near the main crack surfaces, indicating that the fracture mode was predominantly intergranular, as shown in Figure 4.

Figure 4. Macromorphology of cracks in SA-106B steel pipe bends
(a) Spiral distribution of cracks (b) Surface scratches and yellow deposits at the crack site
Further metallographic analysis was performed on Specimens 1 and 2, while a third specimen (Specimen 3) was taken from an unheated region far from the hot-bending crack zone. All three specimens were etched with a 4% nitric acid solution for 4–5 seconds and examined under an optical microscope to observe their microstructures. Both Specimens 1 and 2 displayed ferrite + pearlite microstructures at the crack sites, whereas the unheated Specimen 3 showed a similar ferrite–pearlite structure, as illustrated in Figure 5. According to the literature, SA-106B steel in the normalized state exhibits a ferrite–pearlite microstructure. Therefore, Specimen 3 represents the normalized condition, while Specimens 1 and 2, subjected to induction heating at 900–950 °C during hot bending, retained the same ferrite–pearlite microstructure.

Figure 5. Metallographic structures of SA-106B steel specimens
(a) Specimen 1—crack area (b) Specimen 2—crack area (c) Specimen 3—unheated region
Further scanning and compositional analyses were performed on the regions adjacent to the cracks in Specimens 1 and 2. A small amount of white foreign material was detected along the crack edges of both specimens, while no non-metallic inclusions were observed. Energy-dispersive spectroscopy (EDS) of the white material revealed the presence of Fe, Cu, Zn, and O elements. The Zn and O contents were relatively low, whereas the Cu content was notably high, ranging from 56.5% to 77.5%. These results indicate that the white substance was a Cu–Zn alloy (brass). In addition, yellow deposits were observed around the crack areas. To determine their composition, scanning electron microscopy (SEM) coupled with energy-dispersive spectroscopy (EDS) was performed. As shown in Figure 6, the analysis revealed the presence of Fe, Cu, and O, with Cu and O contents markedly higher than that of Fe. Therefore, the yellow deposits near the cracks were identified as being primarily composed of CuO, with a minor amount of iron oxide.

Figure 6. EDS analysis of yellow deposits near the crack area in SA-106B steel pipes
Cracking of steel pipes during bending is a common issue in pipe manufacturing. The primary factors contributing to such cracking include material properties, hot bending process parameters, and surface defects, with surface defects generally being the dominant cause during hot bending. Typical surface defects include cracks, folds, scars, scratches, and friction marks. Material-related causes primarily involve inappropriate chemical composition, excessive non-metallic inclusions, insufficient strength, or uneven hardness, whereas process-related cracking often results from improper heating temperatures during bending. Figures 5 and 6 illustrate the microstructures of the test pipes and the yellow deposits observed adjacent to the cracks, together with their respective energy-dispersive spectroscopy (EDS) analyses. Mechanical and metallurgical testing indicated that the tensile and yield strengths of the steel pipes were well above the standard requirements. Circumferential hardness testing around the full 360° of the pipe revealed a maximum deviation of 10 HBW, reflecting excellent uniformity. Cold flattening tests further confirmed the material’s satisfactory ductility. Metallurgical evaluation revealed a uniform microstructure with consistent grain size, and both the inner and outer surfaces of the pipe were free from defects such as cracks or folds.
Analysis of both cracked and uncracked specimens from the same batch indicated a normal ferrite–pearlite microstructure. Compositional testing confirmed that the cracked specimens complied with standard chemical requirements, exhibiting neither significant segregation nor non-metallic inclusions. Based on these results, it can be concluded that the material properties did not contribute to the occurrence of the observed cracking. The customer’s bending process involves cutting the SA-106B pipe (219.1 mm × 20 mm) into blanks, followed by induction heating at 920–950 °C and subsequent hot bending. This process is well-established and has been employed for many years, indicating that the hot bending technique itself is not responsible for the observed cracking. Factory inspection of the cracked steel pipes, along with surface examination of the customer’s unprocessed material, revealed no defects such as cracks, folds, or scarring. However, some samples exhibited spiral scratches that corresponded with the spiral pattern of cracks observed after hot bending, indicating that the cracking was closely associated with these surface defects. Further analysis of the cracked areas revealed the presence of brass and CuO. According to the literature, when the copper content in brass ranges from 56% to 68%, the melting point is approximately 934–967 °C. During induction heating, brass adhering to the steel pipe surface gradually melts, and Cu diffuses toward the surface, with the diffusion rate increasing as the temperature rises. Based on the Fe–Cu phase diagram, the solubility of copper in iron increases with temperature. At a critical temperature, copper reacts with iron to form a Cu-rich phase. In the hot bending process, induction heating leads to the formation of a molten Cu-rich phase from the Cu and Cu oxides on the steel pipe surface, with a lower melting point of around 950 °C. This Cu-rich phase infiltrates the steel matrix along grain boundaries, increasing the copper concentration at the pipe surface and altering the original chemical composition. As heating continues, the Cu-rich phase erodes the grain boundaries of the pipe’s outer wall and gradually diffuses inward, forming a Cu–matrix eutectic along the grain boundaries. This eutectic is brittle, leading to embrittlement of the matrix grain boundaries, a phenomenon referred to as “copper brittleness.” During the phase transformation, the Cu-rich phase gradually precipitates, resulting in granular or network-like formations along the interface with the steel matrix. This interface acts as a site of stress concentration, rendering the steel pipe highly susceptible to cracking under external forces. When a steel pipe is bent, tensile stress on the outer curved surface may cause small cracks to develop along the grain boundaries, leading to intergranular microcracks. These microcracks weaken the bonding between grains, rapidly reducing both the strength and plasticity of the steel at the pipe’s outer surface. As the material is unable to deform plastically during bending, it becomes susceptible to brittle failure, resulting in cracking. In summary, the primary cause of hot bending cracking in SA-106B steel is “brass adhesion.” When brass adheres to the steel pipe surface, induction heating during bending can melt the brass, enabling copper to penetrate the steel’s grain boundaries along the surface. Under the tensile stress imposed during bending, this leads to “copper-induced brittleness” and subsequent cracking. Further analysis indicates that, for steel pipes intended for hot bending, contact with copper fittings or other low-melting-point metals must be strictly avoided during production to prevent copper-induced brittleness. This precaution should extend to transfer, loading, unloading, and storage. If low-melting-point metal contamination is detected on the pipe surface, surface treatment methods such as shot blasting or grinding are recommended to remove contaminants and prevent their adverse effects on subsequent hot bending operations.
The production process for SA-106B steel pipes is as follows: molten iron from a blast furnace → 120 t converter (LF + RH) → continuous casting of 230 mm round billets → billet heating → pipe piercing → pipe rolling for diameter reduction → normalizing → straightening → flaw detection → finishing and storage. Based on the preceding analysis, the cause of cracking was identified as localized copper (Cu) adhesion on the steel pipe’s outer surface. As shown in Figure 5, the Cu remained on the surface without penetrating the underlying layer. Therefore, any process involving contact with Cu parts takes place after normalizing. A comprehensive review of the production stages was conducted to identify potential points of Cu contact. It was found that the guide tube at the outlet of the straightening machine was made of brass containing 62% copper. Considering the working principle of the straightening machine, in which the steel pipe advances in a spiral, the outer surface of the pipe came into partial contact with the brass guide tube. Friction between the pipe and the brass sleeve produced localized spiral marks, and Cu from the brass adhered to these areas, which served as the root cause of cracking during subsequent hot bending. To resolve this issue, the brass guide sleeve at the rear exit of the straightener was replaced with a nylon sheet, preventing further copper contamination and protecting the steel pipe surface from frictional damage. Following this improvement, mass production of SA-106B steel pipes resumed. Surface inspections after delivery confirmed the absence of Cu adhesion, and monitoring during customer hot bending operations revealed no instances of cracking.
- The primary cause of hot bending cracking in SA-106B steel pipes is copper adhesion on the pipe surface. During induction heating, copper can diffuse along the steel’s grain boundaries. Under tensile stress during bending, this results in copper-induced brittleness and subsequent cracking.
- Replacing the guide tube at the outlet of the straightening machine with a nylon plate effectively prevents contact between the steel pipe and copper components, thereby eliminating the risk of copper adhesion. Since implementing this improvement, mass-produced SA-106B steel pipes have shown no occurrences of copper-induced brittleness cracking.
- For steel pipes intended for hot bending, contact with copper fittings or other low-melting-point metal components should be strictly avoided during production to prevent copper-induced brittleness or cracking caused by contamination.
- Similarly, during transfer, loading, unloading, and storage, steel pipes should be kept away from copper fittings and other low-melting-point metals. If contaminants are detected on the pipe surface, shot blasting or grinding is recommended to remove them and minimize their impact on subsequent hot bending.